Install Mysql cluster

การทำงาน

เรียนรู้การติดตั้ง mysql-cluster โดยการติดตั้ง vagrantfile ด้านล่างนี้
    $ mkdir cluster
    $ vagrant plugin install vagrant-vbguest
    $ vim Vagrantfile
สร้าง Vagrantfile สำหรับ cluster
# -*- mode: ruby -*-
# vi: set ft=ruby :

# All Vagrant configuration is done below. The "2" in Vagrant.configure
# configures the configuration version (we support older styles for
# backwards compatibility). Please don't change it unless you know what
# you're doing.

Vagrant.configure(2) do |config|
    config.vm.synced_folder ".", "/vagrant", type:"virtualbox"
    if Vagrant.has_plugin?("vagrant-timezone")
        config.timezone.value = "Asia/Bangkok"
    end
    config.vm.define "node1" do |node|
        node.vm.box = "centos/7"
        node.vm.hostname = "mysql-node1"
        node.vm.network :private_network, ip: "10.1.0.11"
    end

    config.vm.define "node2" do |node|
        node.vm.box = "centos/7"
        node.vm.hostname = "mysql-node2"
        node.vm.network :private_network, ip: "10.1.0.12"
    end

    config.vm.define "node3" do |node|
        node.vm.box = "centos/7"
        node.vm.hostname = "mysql-node3"
        node.vm.network :private_network, ip: "10.1.0.13"
    end

    config.vm.define "web" do |node|
        node.vm.box = "centos/7"
        node.vm.hostname = "mysql-web"
        node.vm.network :private_network, ip: "10.1.0.10"
    end
    config.vm.provider "virtualbox" do |v|
        v.memory = 2048
        v.cpus = 2
    end
end
    $ vagrant up
    $ vagrant status

    Current machine states:

    node1                     running (virtualbox)
    node2                     running (virtualbox)
    node3                     running (virtualbox)
    web                       running (virtualbox)

    $ vagrant ssh node1 -c "hostname -s"
    $ vagrant ssh node2 -c "hostname -s"
    $ vagrant ssh node3 -c "hostname -s"
ขั้นตอนดังต่อไปนี้
(แนะนำ ให้เปิดด้วย 3 terminal)
- ให้ทำการแก้ไข local ให้กับทุกครบทุกเครื่อง node1, node2, node3, web
    (login vagrant  และเปลี่ยนเป็น root user)
    vagrant ssh node1
    sudo su -
ให้ทำการข้างต้นใน node2,node3
    vi /etc/environment

    LANG=en_US.utf-8
    LC_ALL=en_US.utf-8
1. เพิ่ม repository ให้กับทุกครบทุกเครื่อง node1, node2, node3, web
    vi /etc/yum.repos.d/galera.repo

    [galera]
    name = Galera
    baseurl = http://releases.galeracluster.com/galera-3/centos/7/x86_64/
    gpgkey = http://releases.galeracluster.com/GPG-KEY-galeracluster.com
    gpgcheck = 1
    [mysql-wsrep]
    name = MySQL-wsrep
    baseurl =  http://releases.galeracluster.com/mysql-wsrep-5.7/centos/7/x86_64/
    gpgkey = http://releases.galeracluster.com/GPG-KEY-galeracluster.com
    gpgcheck = 1
    yum update -y
    yum repolist
2. ติดตั้ง package
    yum -y install galera-3 mysql-wsrep-5.7 rsync lsof policycoreutils-python firewalld

    systemctl enable mysqld
3. เริ่มต้น service
    systemctl enable firewalld
    systemctl start firewalld
4. กำหนด firewall
    firewall-cmd --zone=public --add-service=mysql --permanent
    firewall-cmd --zone=public --add-port=3306/tcp --permanent
    firewall-cmd --zone=public --add-port=4444/tcp --permanent
    firewall-cmd --zone=public --add-port=4567/tcp --permanent
    firewall-cmd --zone=public --add-port=4567/udp --permanent
    firewall-cmd --zone=public --add-port=4568/tcp --permanent
    firewall-cmd --reload
5. ตั้งค่า SE Linux
    vi /etc/sysconfig/selinux
    SELINUX=enforcing
    semanage port -a -t mysqld_port_t -p tcp 4567
    semanage port -a -t mysqld_port_t -p udp 4567
    semanage port -a -t mysqld_port_t -p tcp 4568
    semanage port -a -t mysqld_port_t -p tcp 4444
    semanage permissive -a mysqld_t
6. backup file /etc/my.cnf และเพิ่ม ค่า config ให้เป็น cluster
    cp /etc/my.cnf /etc/my.cnf.bak
    vi /etc/my.cnf
    [mysqld]
    datadir=/var/lib/mysql
    socket=/var/lib/mysql/mysql.sock
    user=mysql
    binlog_format=ROW
    bind-address=0.0.0.0
    default_storage_engine=innodb
    innodb_autoinc_lock_mode=2
    innodb_flush_log_at_trx_commit=0
    innodb_buffer_pool_size=122M
    wsrep_provider=/usr/lib64/galera-3/libgalera_smm.so
    wsrep_provider_options="gcache.size=300M; gcache.page_size=300M"
    wsrep_cluster_name="galera_cluster1"
    wsrep_cluster_address="gcomm://10.1.0.11,10.1.0.12,10.1.0.13"
    wsrep_sst_method=rsync
    server_id=1
    wsrep_node_address="10.1.0.11"
    wsrep_node_name="mysql-node1"

    [mysql_safe]
    log-error=/var/log/mysqld.log
    pid-file=/var/run/mysqld/mysqld.pid
จากขั้นตอนด้านบน จะเป็นของเครื่อง mysql-node1 (10.1.0.11) ให้ทำการข้างต้นใน node2,node3
สำหรับเครื่อง mysql-node2
server_id=2
wsrep_node_address="10.1.0.12"
wsrep_node_name="mysql-node2"
สำหรับเครื่อง mysql-node3
server_id=3
wsrep_node_address="10.1.0.13"
wsrep_node_name="mysql-node3"
7. สร้าง log
    touch /var/log/mysqld.log
    chown mysql:mysql /var/log/mysqld.log
8. start MySQl cluster
เริ่มต้น ที่ โหนด mysql-node1
ให้สั่งคำสั่งนี้ที่โหนดที่ 1
/usr/bin/mysqld_bootstrap
ผลที่ได้ จำได้ password ชั่วคราว (Temporary password) โดยหาได้จาก
    journalctl -u mysqld | grep "password"

    A temporary password is generated for root@localhost: xqboGysQ?5k-
นำ password xqboGysQ?5k- (แต่ละคนจะต่างกัน) ที่ได้มาสร้าง root password เปลี่ยนเป็น "P@ssw0rd"
    /usr/bin/mysql_secure_installation
    Securing the MySQL server deployment.

    Enter password for user root:

    The existing password for the user account root has expired. Please set a new password.

    New password:

    Re-enter new password:
    Sorry, passwords do not match.

    New password:

    Re-enter new password:
    The 'validate_password' plugin is installed on the server.
    The subsequent steps will run with the existing configuration
    of the plugin.
    Using existing password for root.

    Estimated strength of the password: 100
    Change the password for root ? ((Press y|Y for Yes, any other key for No) : no

    By default, a MySQL installation has an anonymous user,
    allowing anyone to log into MySQL without having to have
    a user account created for them. This is intended only for
    testing, and to make the installation go a bit smoother.
    You should remove them before moving into a production
    environment.

    Remove anonymous users? (Press y|Y for Yes, any other key for No) : yes

    Normally, root should only be allowed to connect from
    'localhost'. This ensures that someone cannot guess at
    the root password from the network.

    Disallow root login remotely? (Press y|Y for Yes, any other key for No) : no

    By default, MySQL comes with a database named 'test' that
    anyone can access. This is also intended only for testing,
    and should be removed before moving into a production
    environment.


    Remove test database and access to it? (Press y|Y for Yes, any other key for No) : yes

    Reloading the privilege tables will ensure that all changes
    made so far will take effect immediately.

    Reload privilege tables now? (Press y|Y for Yes, any other key for No) : yes
ตรวจสอบ port
    (port 4567 is actively listening for any replication)

        lsof -i:4567

        COMMAND   PID  USER   FD   TYPE DEVICE SIZE/OFF NODE NAME
        mysqld  14694 mysql   12u  IPv4  39637      0t0  TCP *:tram (LISTEN)

    (port 3306 is actively listening for any MySQL connections.)


        lsof -i:3306
        COMMAND   PID  USER   FD   TYPE DEVICE SIZE/OFF NODE NAME
        mysqld  14694 mysql   35u  IPv4  39654      0t0  TCP *:mysql (LISTEN)
    mysql -u root -p
    mysql> SHOW STATUS LIKE 'wsrep_cluster_size';
    +--------------------+-------+
    | Variable_name      | Value |
    +--------------------+-------+
    | wsrep_cluster_size | 1     |
    +--------------------+-------+
    1 row in set (0.00 sec)


    mysql> SHOW GLOBAL STATUS LIKE 'wsrep_%';

    mysql> SHOW STATUS LIKE 'wsrep_cluster_%';
จากนั้นให้ทำไปยัง mysql-node2, mysql-node3 เพื่อทำการการ start database
root@localhost # systemctl start mysqld
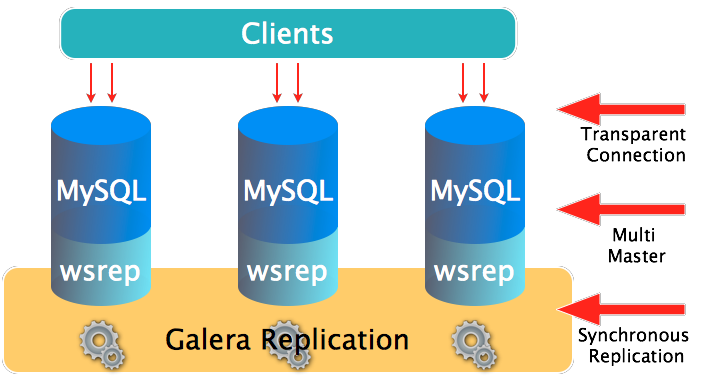
และดูผลได้ที่ mysql-node1 ค่าของ wsrep_cluster_size จะเพิ่มขึ้น เท่ากับจำนวน ของ cluster ที่เพิ่มมา
mysql -u root -p
mysql> SHOW STATUS LIKE 'wsrep_cluster_size';
+--------------------+-------+
| Variable_name | Value |
+--------------------+-------+
| wsrep_cluster_size | 3 |
+--------------------+-------+
1 row in set (0.00 sec)